A chicken dust bath sounds like one of those small optional details until you watch chickens find the driest, loosest patch of dirt in the yard and claim it like it was built for them. They do not need a fancy spa setup. They need a dry place to roll, scratch, flap, and work dust down through their feathers.
For beginners, the goal is simple: give the flock a dry, loose, easy-to-maintain dust-bathing area that does not turn into mud, does not collect droppings, and does not rely on risky powders or complicated recipes.
The dry corner that taught me the point
The first time I really paid attention to dust bathing, it was not because I had built something clever. It was because the chickens ignored the area that looked nice to me and went straight for the dry, dusty corner that looked almost useless.
That is a humbling little chicken lesson. I was looking at the run like a person. They were using it like chickens. The spot they loved was loose enough to scratch, protected enough to stay dry, and boring enough that nobody had tried to improve it into something worse.
That stuck with me because homesteading has a way of doing this over and over. The useful answer is often smaller than the version you imagined. A dust bath is not a decoration. It is one more low-drama system that helps the flock do normal flock things while making your daily care a little easier to read.
What a dust bath actually does
Chickens dust bathe because it is part of normal grooming behavior. They loosen dry material, settle into it, kick it through their feathers, and shake it out. That helps them manage oil, dirt, and general feather condition. It also gives them something natural to do in the run besides pacing the fence or picking at the same bare patch.
A good dust bath does not have to be expensive. It does have to stay dry enough to function. Wet soil packs down. Mud is not a dust bath. Damp bedding, spilled water, and compacted run dirt are usually signs that the location needs to change before the ingredients do.
Should you use a container or the ground?
The best answer depends on your run. Some flocks already have a dry soil spot they use every day. In that case, your job may be to protect that area from rain, keep waterers away from it, and refresh it when it compacts. You do not have to buy a container just because the internet has tidy photos.
A container helps when the run stays damp, the soil is heavy clay, the birds keep digging where you do not want them, or you need a small controlled area under cover. The container should be low enough that chickens can step in easily and wide enough that at least one bird can settle down without fighting the edge.
What to put in a beginner chicken dust bath
Start with the boring mix first: dry loose soil plus coarse sand or play sand. That gives the flock material that moves through feathers and stays workable. If your soil is already sandy and dry, you may not need much else. If your soil is heavy, sticky, or full of clods, adding sand can keep the bath looser.
A small amount of clean wood ash from untreated wood can be useful for some setups, but I would not make it the foundation of the whole bath. It should be fully cooled, dry, chemical-free, and used lightly. Do not use ash from treated lumber, painted wood, trash fires, charcoal briquettes with additives, or anything you would not want your birds digging through.
I would skip diatomaceous earth in a beginner dust bath. Some people use it, but fine airborne powder is easy to overdo, and chickens already create plenty of dust. A simple dry soil-and-sand bath is a better first system because it is easier to maintain without turning the run into a respiratory cloud.
Where to place the dust bath
Placement matters more than recipe. Put the dust bath where it can stay dry. A covered edge of the run, a shaded corner with good drainage, or a spot protected from roof runoff usually works better than the middle of a traffic path.
Keep it away from waterers if spills are a regular problem. A dust bath beside a leaky water setup becomes a mud bowl, and then everyone is frustrated. If your run has a strong afternoon sun exposure, aim for shade so birds can use it during hot weather without baking themselves in an open pan.
This is where the broader chicken yard plan matters. Shade, drainage, water placement, and access all work together. If the whole run is fighting you, a dust bath will expose that problem quickly.
What matters first
The first priority is dryness. If the bath stays wet, the setup is failing no matter what you put in it. The second priority is access. Chickens need to be able to step in, turn around, settle down, and fling material without the container tipping or trapping them.
The third priority is maintenance. A dust bath that is easy to rake and refresh will stay useful longer than a pretty setup you avoid cleaning. I like small maintenance tasks that can happen during the normal chicken routine because those are the ones that actually survive a busy week.
Recommendations
Simple dust-bath gear worth considering
Useful if needed
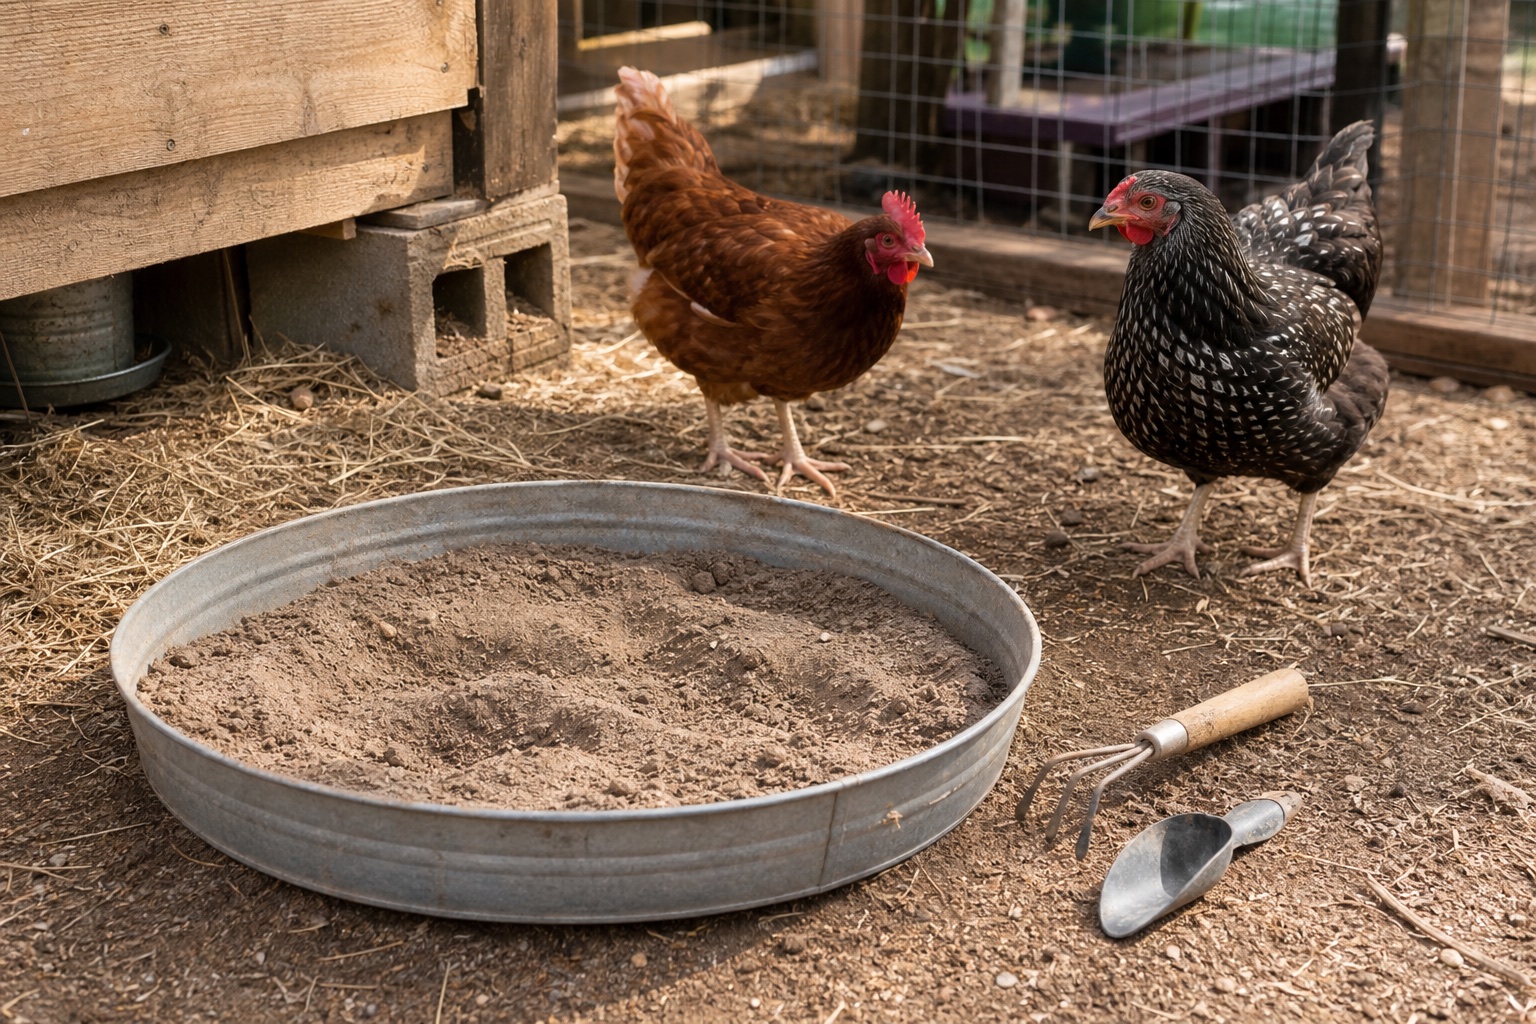
Shallow galvanized tub or low rubber pan
Buy this only if your run does not already offer a dry loose-soil spot. The right container is low, wide, and easy to dump or refresh.
Best for: Wet or compacted chicken runs
Check current pricePractical helper
Small garden rake or hand cultivator
This is the kind of unglamorous tool that makes weekly maintenance easy enough to repeat.
Best for: Loosening and refreshing the dust bath
Check current priceNice to have
Small scoop or trowel
Use it to remove wet clumps, add dry material, and keep the dust bath from becoming another hand-cleaning chore.
Best for: Quick weekly touchups
Check current priceWhat can wait
Most dust-bath upgrades can wait. You do not need special herbs, decorative boxes, custom lids, complicated blends, or a long list of additives before the flock even proves what it will use. Start with one dry spot and watch behavior.
If the chickens ignore the container but keep using a dry patch nearby, believe the chickens. Move the bath, loosen the patch they chose, or protect that spot instead of trying to win an argument with poultry logic. The best chicken systems usually work with their habits before asking them to adjust to ours.
The maintenance rhythm I would use
Add the dust bath to your normal chicken-care loop. Once a week, rake through it, pull out obvious droppings or wet clumps, and add a scoop or two of dry material if the level has dropped. After rain, check it sooner. After a waterer leak, assume it needs attention.
If the bath smells sour, stays damp, or starts collecting more manure than dust, the location is wrong or the container is too easy to perch on. Move it, cover it, or simplify the setup. The answer is usually placement and maintenance before ingredients.
The beginner scenario I would plan for
If I were setting up a first small flock today, I would not start by buying a dust-bath kit. I would walk the run after a dry day, look for the spot that stays loose and protected, and give the flock a simple bath there first. If the ground was heavy or damp, I would use a shallow tub under cover with dry soil and sand.
That approach keeps the decision grounded. You are not trying to copy a photo. You are trying to answer a practical question: where can the chickens keep themselves occupied and groomed without creating another mess for the family to manage?
That is the bigger lesson I keep coming back to with chickens. The best beginner systems are not usually the fanciest ones. They are the ones that make normal care more repeatable and make chicken behavior easier to understand.
Build the Rest of the Run Around Daily Care
Place the dust bath inside a better chicken yard plan.
Use the beginner chicken yard setup guide to think through shade, water, dry ground, feed storage, fencing, and chore access before the run starts fighting you.
Read the chicken yard setup guideRecommended next reads
Keep going with chicken-care basics
These next guides help connect the dust bath to the rest of the flock-care system.
Chickens
Daily Chicken Care Routine for Busy Families
A realistic morning and evening chicken-care routine built around fresh water, feed, eggs, observation, a secure coop, and the few checks busy families should not skip.
Chickens
How to Keep a Chicken Coop From Smelling Bad in Summer
A practical summer coop odor guide for beginners: ventilation, dry bedding, manure under roosts, water leaks, run drainage, ammonia warning signs, and what not to cover up.
Chickens
How to Keep Backyard Chickens Cool in Summer
A practical summer heat guide for backyard chickens: water, shade, airflow, feeding timing, warning signs, and the beginner mistakes that make hot days harder.
Frequently asked questions
What should I put in a chicken dust bath?
Start with dry loose soil and coarse sand or play sand. A small amount of clean wood ash from untreated wood can be optional, but beginners should keep the mix simple, dry, and free of chemicals.
Do chickens need a dust bath in the run?
Yes, chickens need access to dry loose material where they can dust bathe. If your run already has a dry soil spot they use, you may only need to protect and maintain that area instead of buying a separate container.
Should I add diatomaceous earth to a chicken dust bath?
I would skip diatomaceous earth in a beginner dust bath. Fine airborne powders are easy to overdo, and a dust bath should not replace proper mite or lice treatment when there is an actual flock-health problem.
How often should I clean a chicken dust bath?
Check it weekly. Remove wet clumps, droppings, and spilled bedding, then loosen or top off the dry material as needed. After heavy rain or a waterer leak, refresh it sooner.
Recommendations
Useful tools and resources for this decision
These are included only where they reduce repeated friction, clarify a next step, or help you avoid buying the wrong thing first.
Useful first container
Shallow galvanized tub or low rubber pan
A low container gives beginners a controlled dust-bath area when the run does not already have a dry loose-soil corner.
Best for: Runs with wet ground, compacted soil, or no obvious dust-bathing spot
Check current priceLow-cost chore helper
Small garden rake or hand cultivator
A small rake is enough to loosen compacted material, mix in dry soil, and pull out clumps during weekly checks.
Best for: Maintaining the dust bath without dragging out full-size tools
Check current priceSimple add-on
Small scoop or garden trowel
A scoop helps remove wet material and top off the dust bath without handling the mix by hand.
Best for: Weekly run checks and small refreshes
Check current priceRead next
Beginner chicken yard setup guide
Use the chicken yard guide to place the dust bath alongside shade, water, fencing, feed storage, and daily access.
Best for: Building the whole run around daily care
Read the guideRecommended next reads
Read next if it helps the decision
Move into the next guide only if it clarifies the next practical step.
Chickens
Beginner Chicken Yard Setup: What to Put Inside the Run
A practical beginner guide to setting up a chicken yard or run with shade, water, dust bathing, fencing, storage, and daily-care access that actually works.
Chickens
Daily Chicken Care Routine for Busy Families
A realistic morning and evening chicken-care routine built around fresh water, feed, eggs, observation, a secure coop, and the few checks busy families should not skip.
Chickens
How to Keep a Chicken Coop From Smelling Bad in Summer
A practical summer coop odor guide for beginners: ventilation, dry bedding, manure under roosts, water leaks, run drainage, ammonia warning signs, and what not to cover up.
Chicken setup support
Get the chicken setup checklist before you buy more flock gear.
Use the first-year checklist to price the flock honestly, cover the starter essentials, and delay the upgrades that can wait.
Best for: Readers trying to price a first flock honestly and avoid a scattered chicken setup.
- A pre-chick setup checklist
- A recurring-cost planning section
- A simple weekly flock-care rhythm
Chicken setup notes, beginner flock lessons, and the checklist first.
After signup, the download will unlock right here so you can save or print it.
About the author
William Mock
Founder, writer, and beginner homesteader
William writes from the beginner side of rebuilding after a layoff: homestead plans, family systems, budgets, tools, and the decisions that make a home feel less fragile.
Read why this site existsRelated Guides
Keep building context
Chickens
Beginner Chicken Yard Setup: What to Put Inside the Run
A practical beginner guide to setting up a chicken yard or run with shade, water, dust bathing, fencing, storage, and daily-care access that actually works.
Chickens
Daily Chicken Care Routine for Busy Families
A realistic morning and evening chicken-care routine built around fresh water, feed, eggs, observation, a secure coop, and the few checks busy families should not skip.
Chickens
How to Keep a Chicken Coop From Smelling Bad in Summer
A practical summer coop odor guide for beginners: ventilation, dry bedding, manure under roosts, water leaks, run drainage, ammonia warning signs, and what not to cover up.